In Part 1 of "Inside a $34 Smartphone" we poked at the software side of the dirt cheap Huami H3 smartphone.

We now know the phone is a Spreadtrum SC6825 passing off as a MediaTek. Using fake branding that combines Huawei and Xiaomi into Huami - something less than either.
Ka-boom!
And then, this post exploded! Someone posted it to Hacker News, and then it got posted to the Android sub-reddit. It even made it to the Chinese news site Solidot (translated). It's great to see that other people also find this stuff interesting!
"Inside a $34 Smartphone" is already my most popular post - eclipsing the previous record which was also about cheap electronics. The page has had over 700,000 hits in less than 3 days. I don't know exactly how many people read the article because my self-hosted analytics (Piwik, otherwise excellent) got overloaded early on.
I also learned some hard lessons about Wordpress blog configuration and the "Reddit hug of death". Main lesson: don't move your Wordpress install into someone else's Docker container if you care about performance - turns out they don't actually know any better than you. I might post about that some day...
Feedback
The post also attracted some interesting and insightful comments. Here's a few I noticed:
-
Jan Jongboom, who works on FireFox OS, commented to let me know Spreadtrum FirefoxOS phones are already on the market. The Intex Cloud FX has been on sale in India since September. Somehow I missed this, thanks for the heads up Jan!
I also found this great talk video of Jan talking about using cheap phones as a platform for Internet-of-Things devices. Interesting stuff!
-
ghoul2 has a custom kernel and Debian running on one of these Firefox OS phones. They're using it to teach Linux kernel hacking to college students. Nice! This is the kind of thing I was hoping would be possible with the H3.
-
Several people pointed out that the mysterious "Timer Switch Machine" is probably auto on/off, reproducing a common MediaTek feature. I haven't tried this but it sounds likely.
-
There are similarly priced Spreadtrum phones available direct from China online in the $30-$35 range, such as this and this. These looks like honest options compared to the Huami H3!
-
Many people posted about cheap/cheaper prepaid phones. For a cheap phone then prepaid, or a used phone, may be a great option. My post wasn't really intended as a shopping guide, but I guess a lot of people saw it that way!
At the same time it's important to realise that cheap prepaid phones are usually carrier locked, and the price is subsidised by the carrier's business model - the profit is in the carrier service. Phones like the Huami H3 aren't locked to any carrier, and the seller has no business model apart from making a profit on the sale.
-
StarBrilliant posted on Solidot (in Chinese) to say they had an identical phone, but with a quad core SC8825 processor inside. Unfortunately they didn't post any pictures.
-
I should be able to root the H3 easily. This is on my "to do" list to try soon!
-
The little bubble that was annoying me in the video is apparently very common in China. The story is that people were worried about wearing out their iPhone's home button! Like most recent Android phones, the H3 has a capacitive home button but I guess old habits die hard.
-
I also realised something obvious that I should have tried earlier:
adb reboot recoveryworks and the Huami reboots into the standard Android system recovery. So that's at least one update avenue! I haven't had any luck with Fastboot, or finding a button combination that starts recovery at power-on.
Teardown Time!
Anyhow, on with this post. The first part examined the software side of this super-cheap device. In this part we'll take a closer look at the hardware inside.
Easy to open
iFixit would approve of the H3. All you need to take it apart is a Phillips head screwdriver.
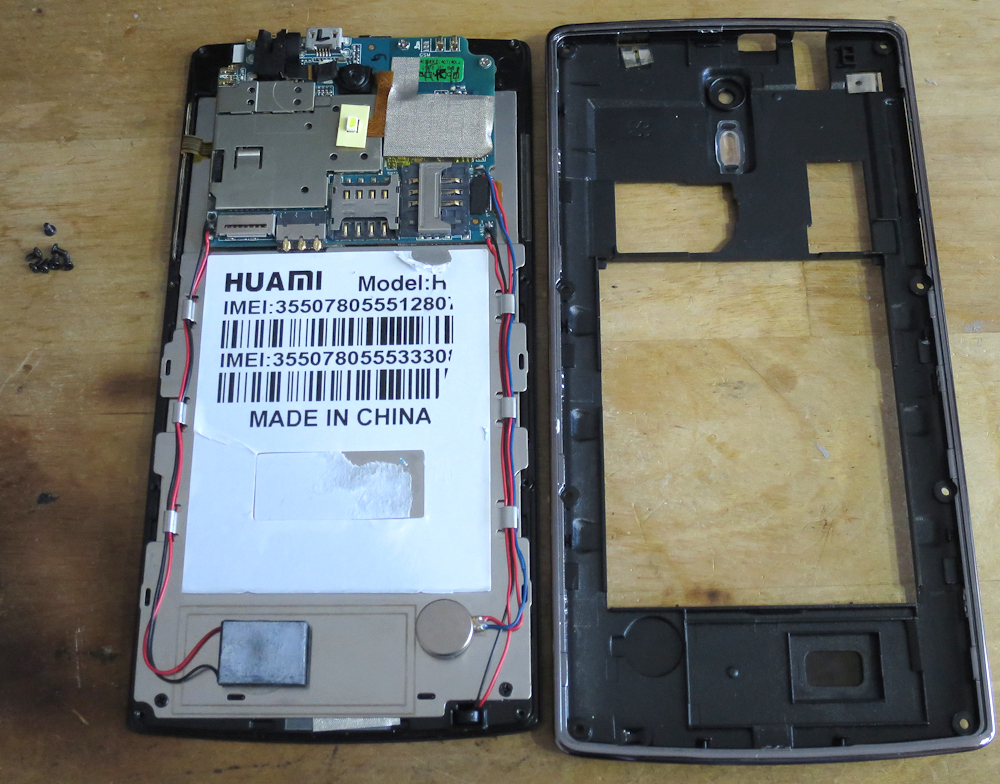
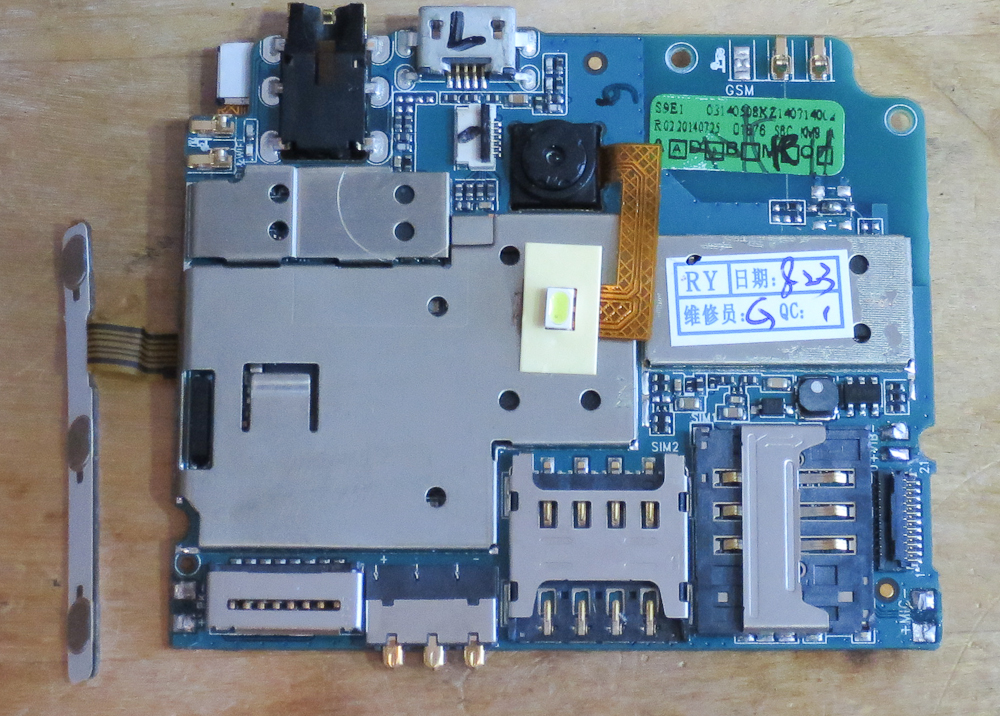
Removing the frame under the battery cover reveals the mainboard:
At the top next to the USB connector is a ribbon cable that connects to the touchscreen digitiser.
The main chassis of the phone is a large aluminium plate, held down by just two retaining screws. The vibrator motor and the speaker are just glued to it. With the retaining screws removed, the plate and the mainboard come out together:
Most of the mainboard is covered in kapton tape to prevent it shorting against the LCD screen that it's sandwiched on top of. The gaps in the kapton tape are for ground connections.
Pads of conductive metal tape are used for ground connections to the LCD and the rest of the phone's chassis.
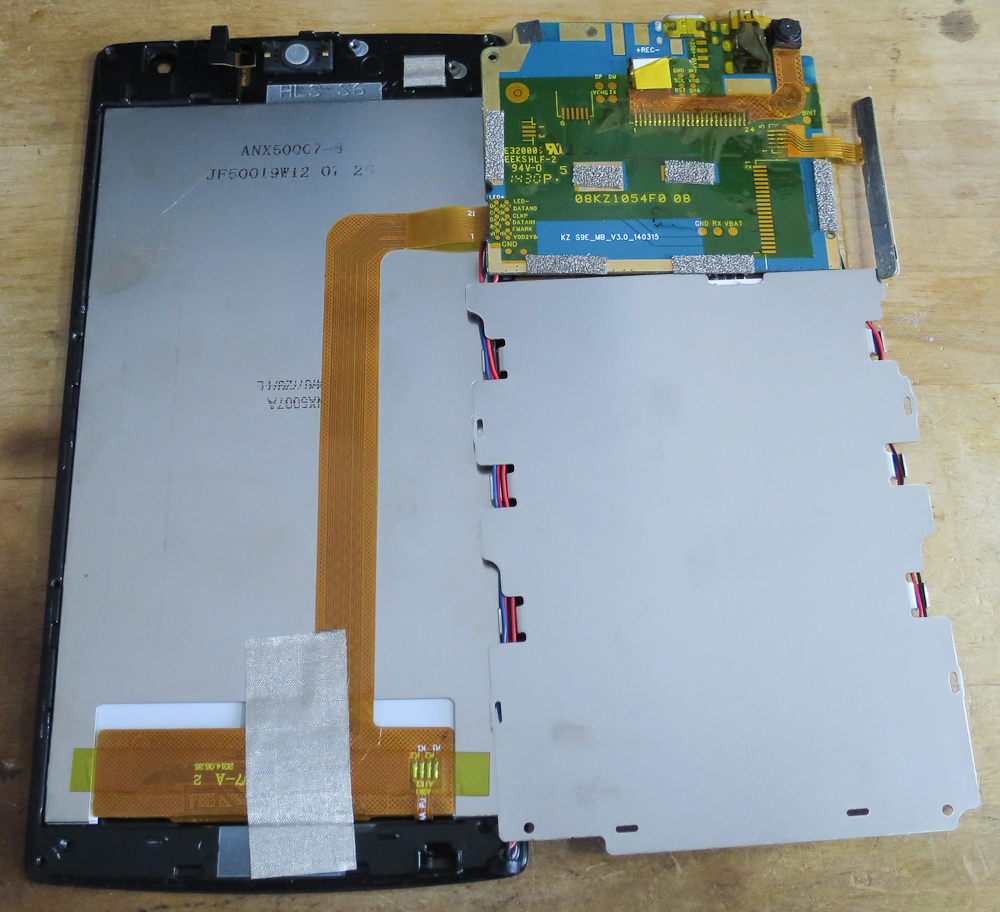
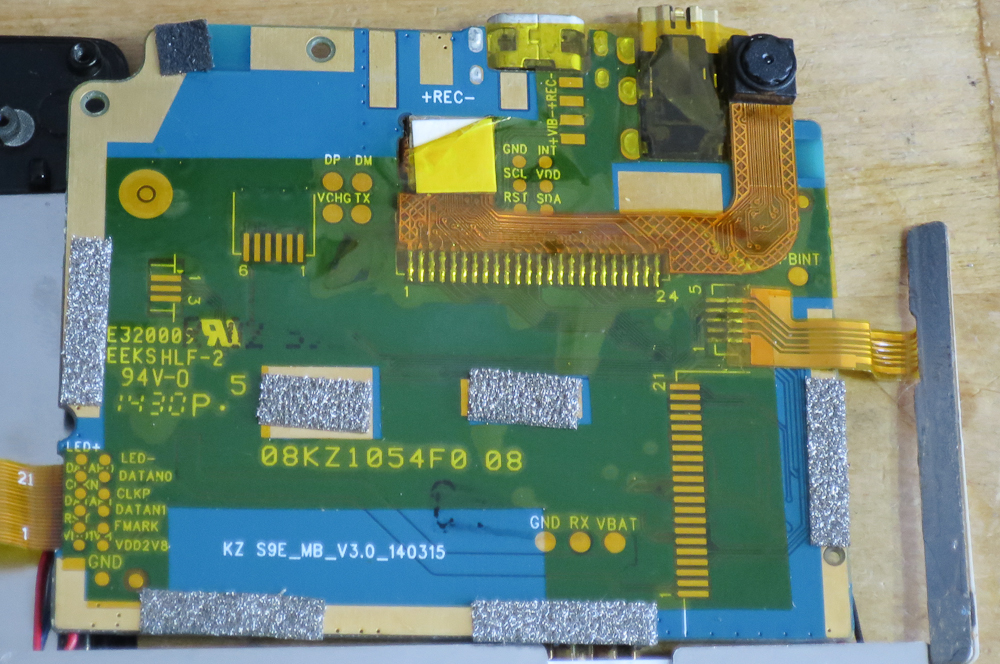
The model of the mainboard PCB is S9E_MB_V3.0_140315. So the hardware design is probably just over a year old:
-
The 21 pin connector on the right is a MIPI DSI interface for the LCD screen. The back of the board has labelled test points for most of the pins. Very thoughtful!
{=html} </p> -
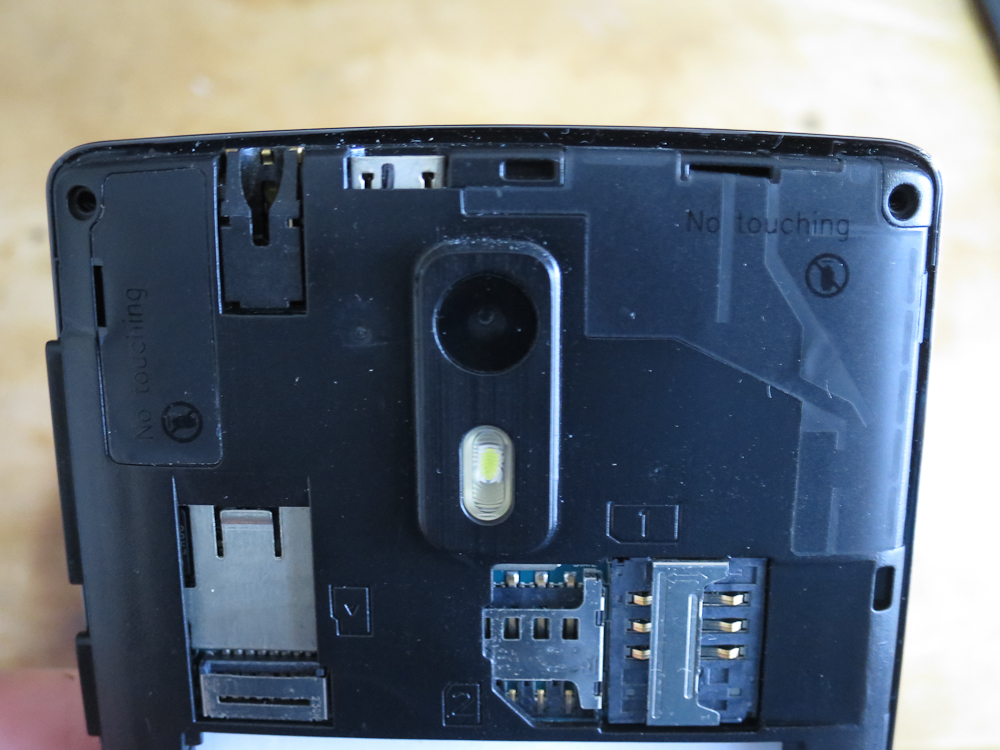
The flexible cable at the top connects to both front and back cameras, and the flash. It is soldered directly to the back of the mainboard under the tape. This is probably a MIPI Camera. Yay standards! It's a shame it doesn't use a connector, but I guess every cent counts.
-
The long thin board on the left is for the three side buttons - power and volume.
The extra unpopulated connectors on the bottom suggest this same mainboard is probably used in a number of different phones.
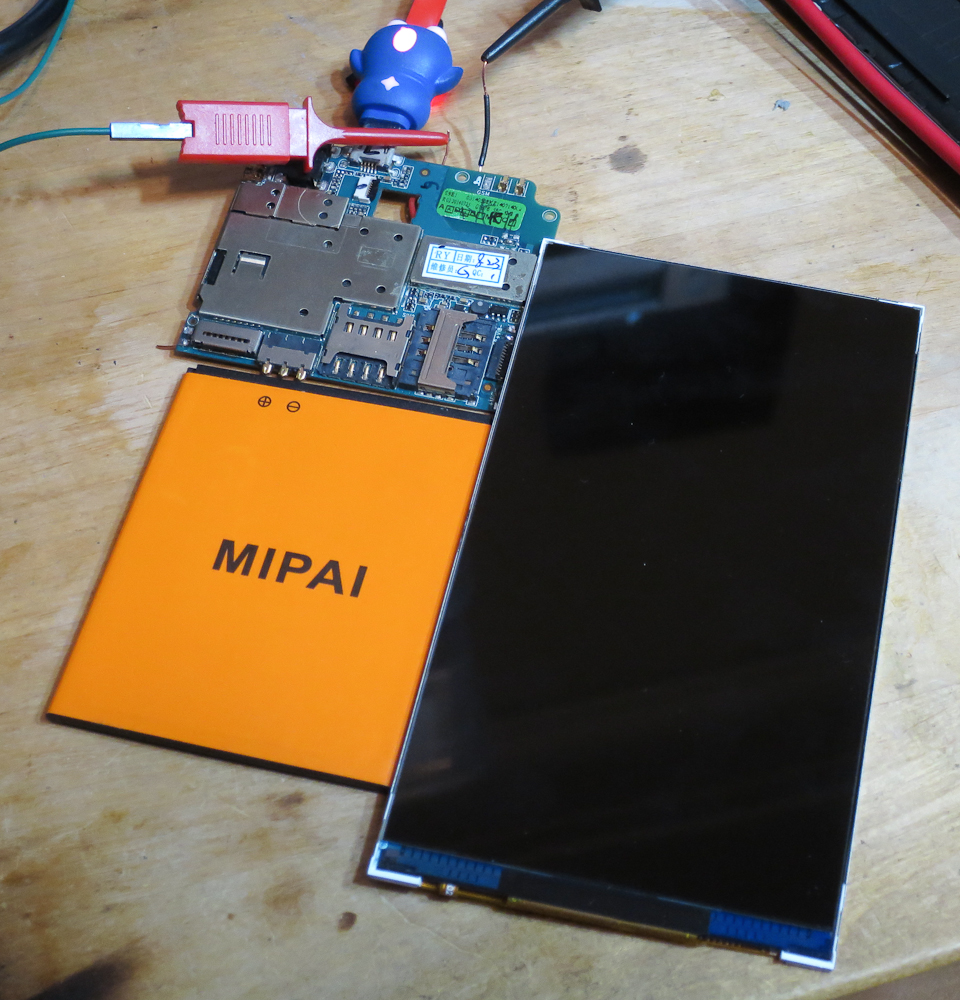
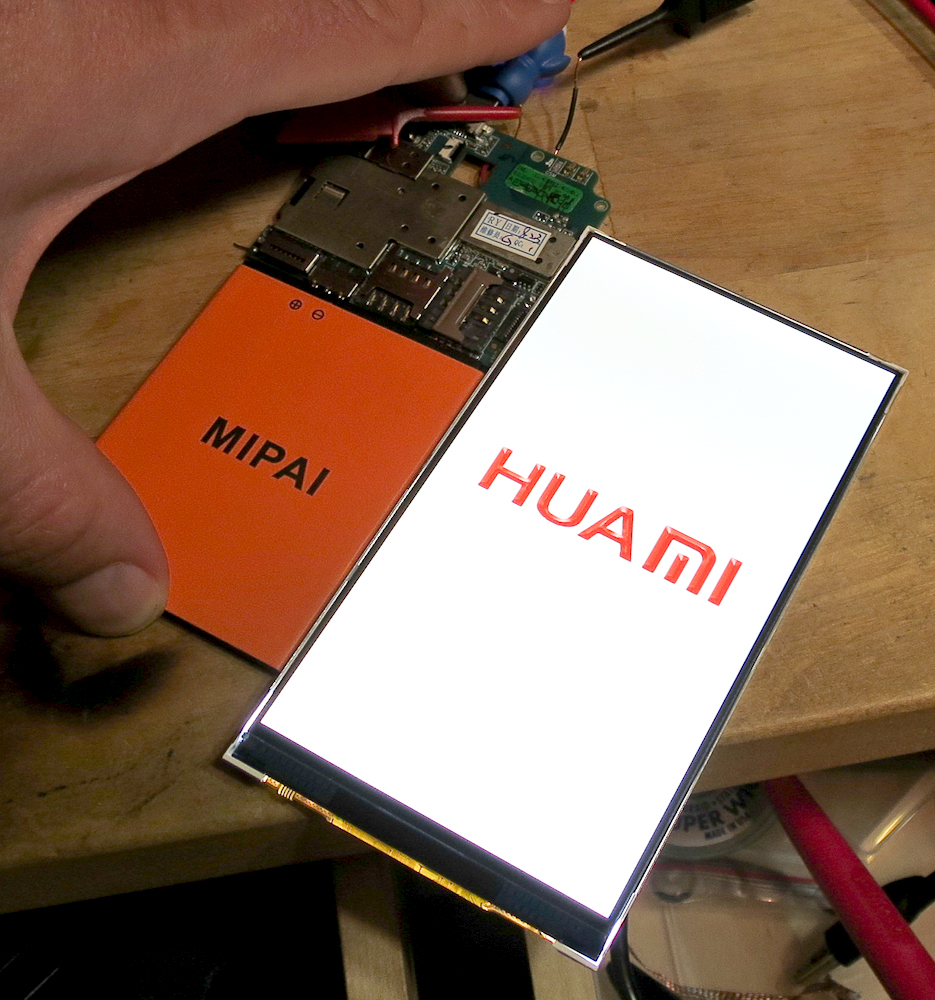
LCD
The next disassembly step is to disconnect the LCD screen connector from the mainboard. Then the LCD pops off the touchscreen. It's only held on by a single piece of siver tape, and the pressure of the components sandwiched around it.
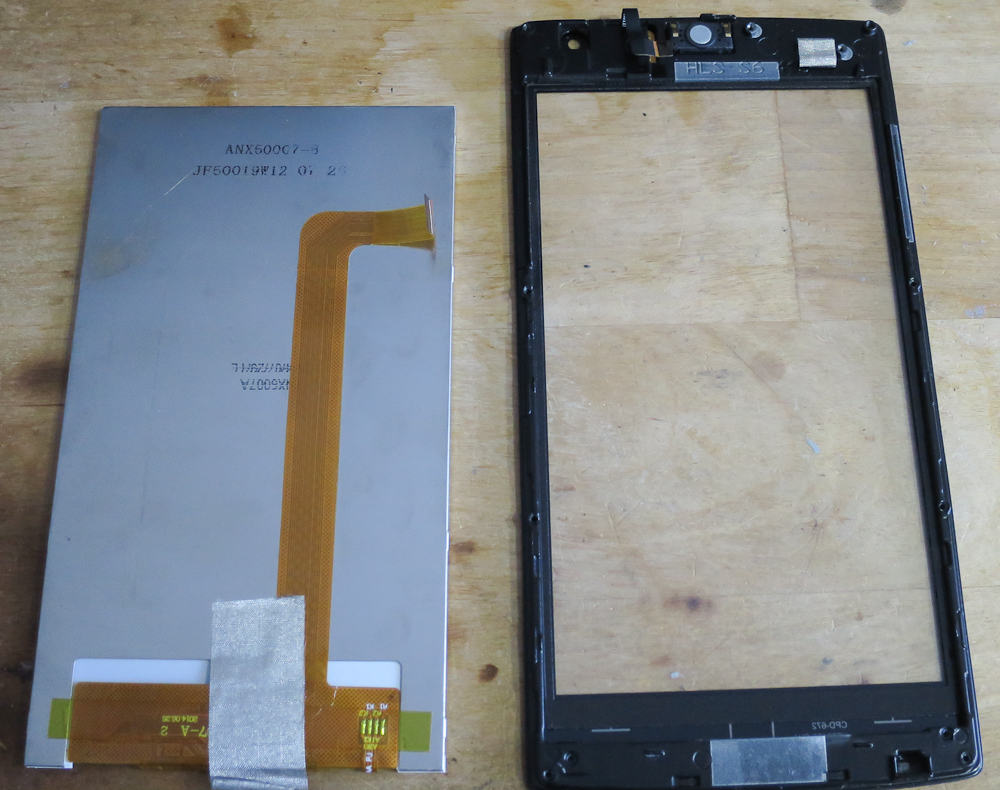
This is quite simple compared to most smartphones, where the LCD is glued to the touchscreen. Probably not so great when dust starts collecting in the gap between LCD and touchscreen. At least it's easy to dismantle and clean, or to repair if something fails!
The back of the panel is marked ANX50007 and JF50019W12 07 26. Searching for these didn't turn up much information.
Can Opening
Desoldering the RF shields reveal the rest of the components:
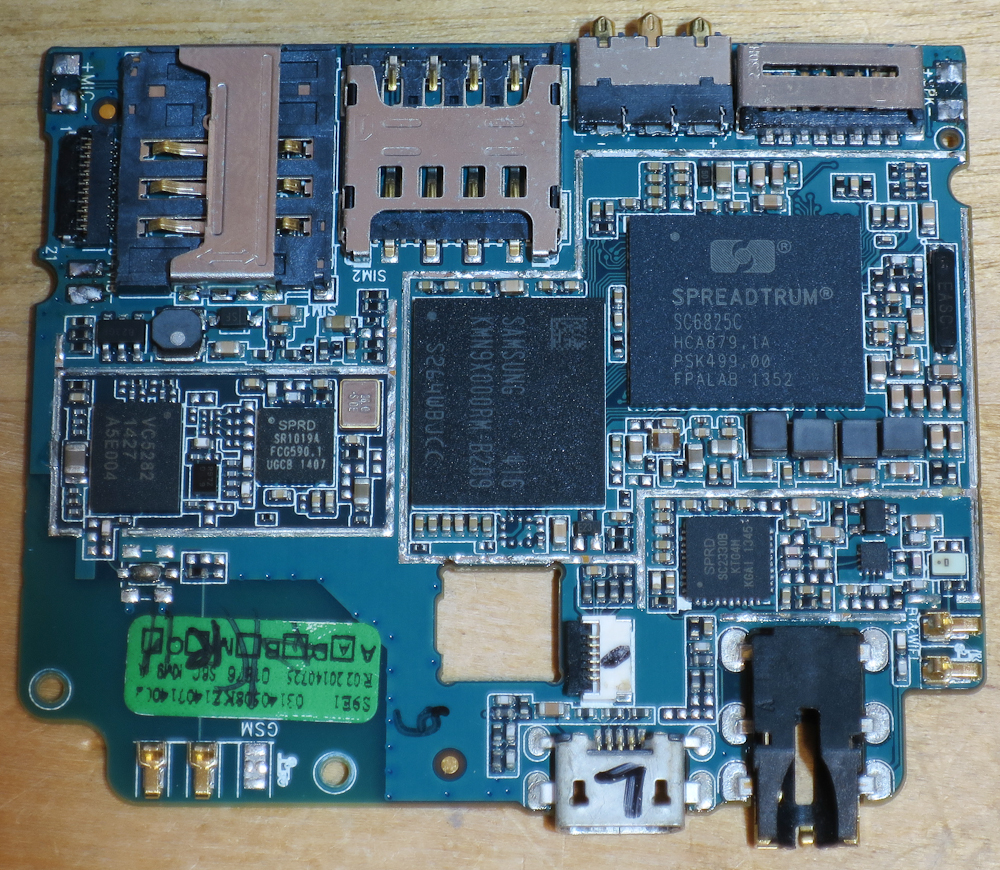
From left to right:
-
Vanchip VC5282 dual band GSM power amplifier.
{=html} </p> -
Spreadtrum SR1019 RF transceiver. I dug up this service manual PDF for another Spreadtrum phone that also uses these two components together.
-
Samsung KMNX9000RM-B209 - 2GB eMMC flash and 2Gb (256MB) RAM in a single package. The 2GB of flash is unexpected, as only 1.2GB was visible from Android/Linux. Where is the rest used?
-
Spreadtrum SC2330B. This is apparently just a WiFi interface. I don't know where the Bluetooth interface is. Maybe there are different variants of this chip, some with Bluetooth and some without?
-
Spreadtrum SC6825C. The main system on a chip, 1GHz dual core ARM Cortex A5.
To be honest, I was hoping this component list would be a bit more interesting. I imagined, for example, some dual-footprinted parts so the manufacturer could pick and choose the cheapest components at build time. Or other clever tricks to cut costs or recycle used parts from old phones.
Instead this seems like a straightforward Spreadtrum reference design. Not surprising at all, sticking to a reference design keeps development costs low. It's just not as interesting as it could be.
Test points
Removing the tape, then desoldering the camera and the button board gave access to the mainboard's test points. These were helpfully labelled. Click the images to see larger versions:


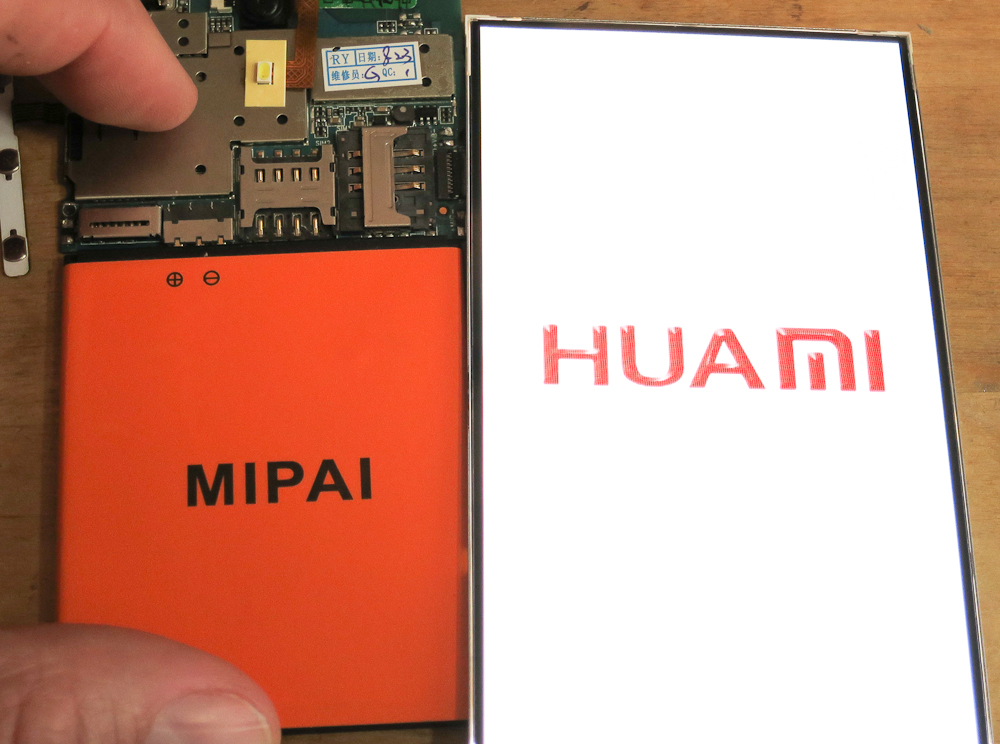
Like most phones, the H3 won't power on without a battery connected. By holding the battery in place I could confirm it worked in this dismantled state:
Test points marked TX and RX suggest a serial port. I soldered some test wires, and wired them up to my trusty Freetronics USBSerial adapter. The SoC serial is 1.8V, but my adapter only goes down to 3.3V.
As a stop-gap I "Macgyvered it" with 10K series resistors so the overvoltage current through the SoC's protection diodes wouldn't burn anything out.
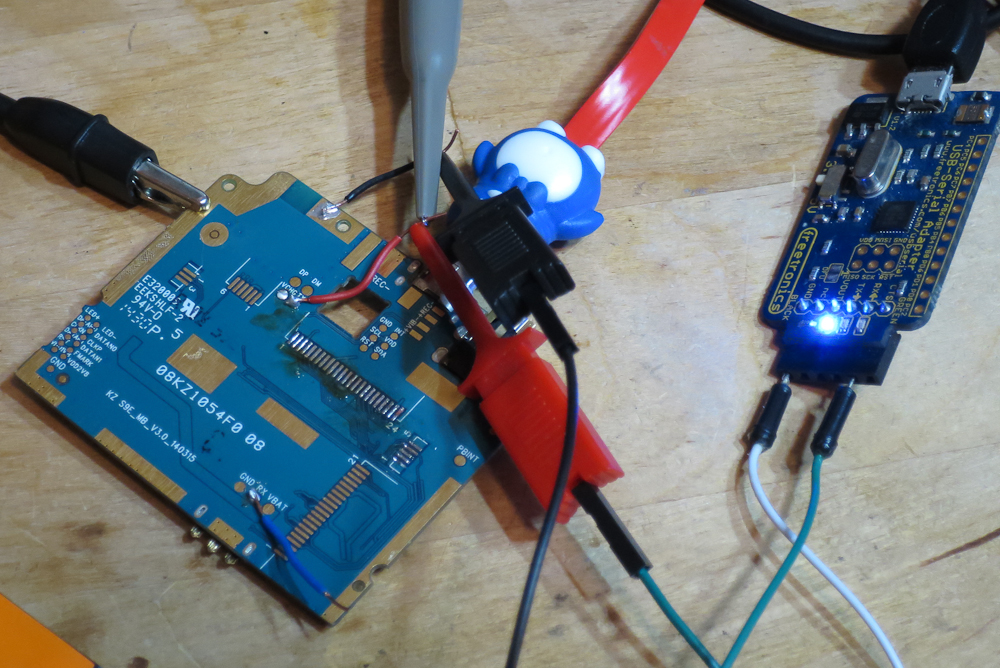
(Yes, that's a penguin themed USB cable. It also has RGB LEDs in it.)
As promised, the serial port let me capture output from the boot sequence. A full log is here.
Interesting things from the boot log:
-
The H3 bootloader seems to be uboot, except it doesn't print a uboot version line. It also skips the "press any key to stop autoboot" step that would allow manually typing bootloader commands.
{=html} </p> -
During boot it scans for several different models of MIPI display controllers. The controllers are integrated into each LCD panel, and they speak the common MIPI protocol to the phone. With a flexible set of drivers, manufacturers can swap in different LCD panels without changing anything in software. On my H3 the controller driver is "fl10801". Someone has posted the datasheet for this ForceLead branded controller on baidu.
-
There's a line in the uboot log that says "
USB SERIAL CONFIGED". A USB device enumerates, using Spreadtrum's USB vendor ID (0x1782), product ID 0x4d00, and product name "Gadget Serial".It seems like this is a common Spreadtrum serial bootloader, and can be used with a tool called 'ResearchDownload' and some Windows drivers, all available from random download sites. When the phone is assembled you can trigger it by holding 'Volume Down' while the phone is off, and simultaneously plugging it into USB. I haven't tried 'ResearchDownload' yet, unfortunately it sounds like it can only write images not read them - taking a backup involves flashing a working CWM for the phone model first.
Red Bend vLM
Something unexpected appears at the end of the boot log, at the time uboot would normally be booting the kernel:
Reading dsp to 0x80020000
Reading kernel to 0x84508000
Reading bootimg to 0x84508000
Reading modem to 0x80500000
Reading vmjaluna to 0x80400000
Checking factorymode : 1
spl_data adr 0x8f9be054 harsh_data adr 0x8f9c2054
pass cmdline: initrd=0x85500000,0x2375d9 apv="sp6825c3plus-user 4.0.3 IML74K 26 test-keys" androidboot.mode=charger lcd_id=ID1801 factory=1 ram=256M fixnv=0x80480000,0x10000 productinfo=0x80490000,0xc00 runtimenv=0x804a0000,0x40000
\[0;31m@"
Red Bend vLM 5.0
Copyright (c) 2002-2011, Red Bend Software. All rights reserved.

NK0: Processor revision r0p1 (ARMv7)
NK0: Cache is VIPT dcache line size 32 icache line size 32
NK0: VFP is present
CBSP: console runs in polling mode
Red Bend Software is an embedded technology company. The main thing I found about the "Red Bend vLM" program was these presentation slides from 2013. It seems like vLM is Red Bend's virtualisation software, that "enables multiple operating systems to run on the same hardware". "The hypervisor serves as the scheduler to run multiple operating systems simultaneously and allocate the hardware resources".
I think this is because the SC6825 SoC has a built-in baseband (cellular interface). Instead of using a separate processor for the baseband, the hardware virtualises both the Android OS and the baseband so they run on the same CPU.
This probably explains where the missing 800MB of flash is allocated, too. Some of that is probably Red Bend, and some of it might be space for Red Bend to store recovery data or OTA update data.
From a security and privacy perspective, a hypervisor approach like this seems like an even bigger nightmare than a regular baseband. At least traditional basebands have limited specifications, so the exploit surface and the processing power are both restricted. With virtualisation, the baseband is potentially as complex and powerful as the main CPU!
I noticed something interesting on Red Bend's site, with regards to virtualisation and GPL compliance. Under Features of Virtualisation it says: "This is especially important in the case of one OS being open source and the other being a proprietary OS". What do they mean? If the baseband wasn't virtualised and was just a driver in Android's Linux kernel then it could possibly be subject to GPL open source requirements. By virtualising it away from the main OS, it's excluded from the kernel's GPL scope.
Not that GPL concerns would have bothered the Huami designers - it's not like uboot source or GPL source are available for this device. I still can't find SC6825 GPL source code anywhere online. This may change, though. It seems like Spreadtrum's star is rising, and adoption by more mainstream vendors gives hope that GPL source will appear. If the other phones use the same reference design as the H3, it's possible the source will be usable on many models.
EDIT: SidJenkins on reddit correctly points out that I'm speculating about the Red Bend virtualisation being for a baseband. It could be for some other purpose, the only real evidence I'm going on is an image named "modem" in the log. Not a lot to go on, really.
Disappointingly, I couldn't make the serial boot console respond to input on the RX pin at any time during the boot process. So there doesn't seem to be any easy way to break out of the automatic boot process, or override it.
More Questions
I still have dozens more questions about the Huami H3. Who made it? What else do they make? What's their business model like? How many Huami phones are out there? Where is the factory and who works in it? How do conditions compare to the other electronics factories in Guangdong province? Where do the parts come from? What is the manufacturer's relationship with Spreadtrum like?
Given the secrecy of "shanzhai" manufacturers, I don't think I'll get answers to these questions any time soon. Even for mainstream manufacturers most of this information is either missing or glossed over into a marketing spiel.
I find it sad how industrialisation means that we have such a loose connection to the source of our consumer goods. It's funny to think that by buying a cheap gadget from a Shenzhen market stall, I'm several steps closer to the top of the supply chain than if I bought a similar gadget here in Australia. But I know even less about it.
What's Next?
It feels bad to go to all of this trouble just for some e-waste and two blog posts. I'm still hoping there will be some nifty way to hack into the H3 and repurpose it for something interesting, or dig around further in the OS. I haven't yet done that, but perhaps by rooting with TowelRoot, playing with the "ResearchDownload" USB port, or investigating the SC6821 source code I'll find avenues to interesting hacking.
Like Jan Jongboom in the talk that I linked above, I think these cheap phones have a lot of potential alternative uses as cheap connected sensor platforms, as well as for people who want an affordable smartphone.
I'd also like to learn more about the "Red Bend vLM" and how it works. If you have any experience with this, I'd love to hear about it!
Finally, an open offer to share the love: if you're a security researcher or gadget hacker who publishes publicly, and you'd like to borrow an H3 to investigate further and write about, please drop me an email! (Bonus points if you're in Australia, so we can mail phones around more cheaply.)
Thoughts on “$34 smartphone Part II - Teardown”